

Why Your Proximity Load is Silently Sabotaging You
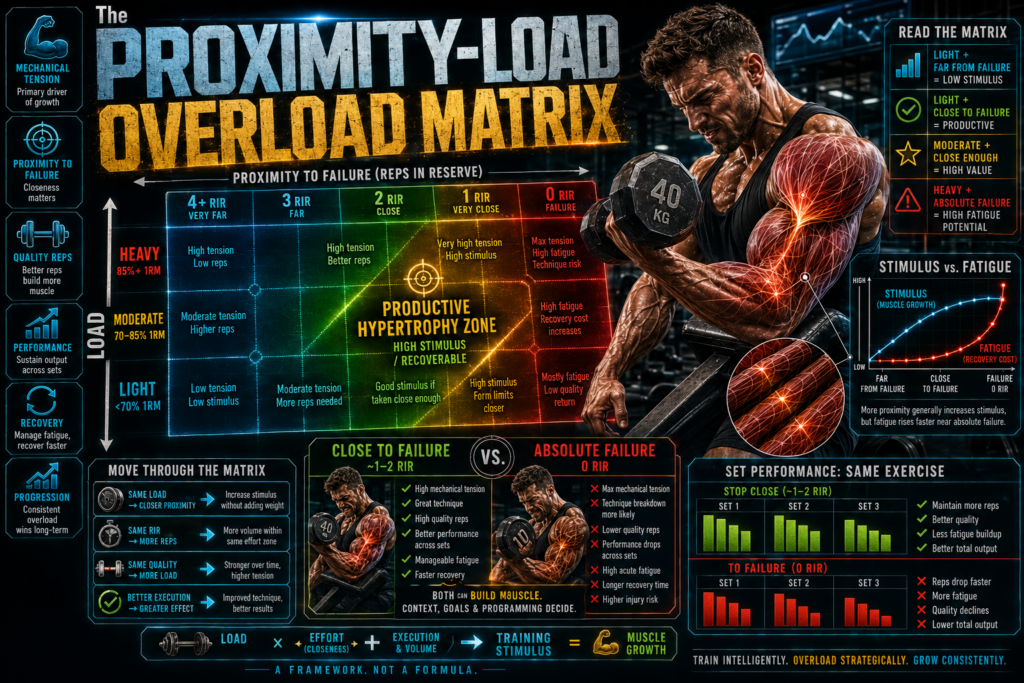
The Proximity Load Overload Matrix combines proximity to failure and load selection into one systematic framework that eliminates guesswork from your training. By tracking both variables strategically, you’ll break plateaus and transform stagnant progress into consistent gains.
You train hard but your muscles refuse to grow past a certain point. Your routine feels stale and your lifts plateau. The Proximity Load Overload Matrix changes how you manipulate training variables to break through these barriers. Understanding this framework transforms frustration into consistent progress.
The Proximity Load Overload Matrix Explains Training Intensity
The Proximity Load Overload Matrix combines two critical factors in one system. Proximity measures how close you push each set to complete failure. Load represents the actual weight you lift during your working sets. Together they create a matrix that predicts your results.
Most beginners pick random weights and stop when sets feel hard. This approach leaves gains on the table. The matrix forces you to track both variables with precision.
Proximity gets measured in reps in reserve. Three reps in reserve means you could have done three more reps. Zero reps in reserve means true muscular failure. Research shows sets taken within three reps of failure produce similar growth.
Load matters because heavier weights recruit more muscle fibers. You can’t build maximum strength with light weights. But you also can’t recover from constant maximum loads.
The matrix reveals the sweet spot between these extremes. High load with moderate proximity builds strength without destroying your nervous system. Moderate load with zero proximity creates metabolic stress for hypertrophy.
How The Proximity Load Overload Matrix Prevents Plateaus
Plateaus happen when your body adapts to consistent training stress. You stop growing because nothing new challenges your muscles. The matrix provides four distinct quadrants to rotate through.
Quadrant one uses high load and low proximity. You lift heavy weights but stay several reps away from failure. This develops strength without excessive fatigue. Powerlifters live in this quadrant during off-season blocks.
Quadrant two combines high load with high proximity. Heavy weights pushed to near failure recruit everything. This quadrant produces the most central nervous system fatigue. Use it sparingly during peak phases.
Quadrant three features moderate load and high proximity. You use lighter weights but push every set to failure. Bodybuilders use this approach to chase the pump. It creates metabolic stress without joint strain.
Quadrant four applies low load and low proximity, functioning as active recovery or deload work. Light weights moved well short of failure increase blood flow and nutrient delivery without accumulating additional fatigue or muscle damage. This quadrant facilitates central nervous system recovery, reduces inflammation from previous hard training, and maintains neuromuscular coordination patterns. Examples include bodyweight exercises, light isolation work, and moderate-intensity conditioning. You heal and supercompensate while preserving movement quality and work capacity for the next hard training phase.
Rotating through quadrants prevents adaptation. Your muscles face new challenges every mesocycle. Strategic supplementation supports recovery when you increase training density across quadrants.
The Proximity Load Overload Matrix Changes Program Design
Traditional programs lock you into one training style for months. You run a strength program until it stops working. Then you switch to hypertrophy work and start over.
The matrix approach builds all qualities simultaneously. Monday might emphasize quadrant one for compound lifts. Wednesday targets quadrant three for accessory movements. Friday combines quadrants strategically based on recovery status.
This variation keeps your body guessing without random chaos. Each session serves a specific purpose within the matrix. Your central nervous system recovers while your muscles still work.
Exercise selection interacts with quadrant choice. Barbell squats suit high load quadrants because they allow progressive overload. Cable flyes work better in high proximity quadrants where you chase failure safely.
Rest periods change based on your quadrant too. Heavy loads need longer rest to replenish phosphocreatine stores. High proximity work with moderate loads thrives on shorter rest periods.
Your weak points determine which quadrant to emphasize. Lagging muscle groups respond to high proximity work pushed to failure. Stubborn strength plateaus crack under planned high load phases.
Proximity Manipulation Unlocks Hidden Growth
Most people never train to true failure. They think a set feels hard and stop prematurely. This habit leaves two to four reps in reserve without realizing it.
Learning accurate proximity assessment takes practice. Video your sets and count actual reps in reserve. The gap between perceived and real proximity shocks most lifters.
Failure training isn’t always necessary for growth. Sets stopped at two reps in reserve produce similar hypertrophy. But you need to know where true failure lives first.
Once you understand your real limits, you can manipulate proximity deliberately. Some exercises never need failure. Deadlifts pushed to zero reps in reserve often cause form breakdown.
Other movements benefit from occasional failure training. Leg extensions and cable curls allow safe failure exploration. These exercises teach you what maximum effort actually feels like.
The matrix helps you program failure strategically. You don’t grind every set into the ground. You apply proximity stress where it produces results without excess fatigue.
Load Progression Within The Proximity Load Overload Matrix
Adding weight to the bar remains the foundation of progress. But the matrix determines when and how you increase loads. Simple linear progression eventually fails for everyone.
High proximity quadrants allow smaller load jumps. You can add two kilograms when sets approach failure. The proximity stress compensates for slower weight increases.
Low proximity quadrants demand bigger load jumps. Adding two kilograms while staying four reps from failure creates minimal adaptation. You need five to ten kilogram increases to drive change.
Wave loading applies matrix principles across weeks. Week one uses moderate loads with moderate proximity. Week two increases load while reducing proximity. Week three pushes both variables higher before deloading.
This approach prevents the grinding plateau where weight barely crawls upward. Your body experiences varied stress that forces new adaptations. Proper nutrition and targeted supplements become essential during high stress phases.
Recovery Demands Shift Across The Proximity Load Overload Matrix
Different quadrants tax different recovery systems. High load work stresses your nervous system and connective tissues. High proximity work depletes muscle glycogen and creates metabolic waste.
You can’t run maximum values for both variables continuously. Your body breaks down before adaptations solidify. Smart programming balances stress with recovery windows.
Quadrant four sessions actively support recovery between hard training days. Light weights moved with reps in reserve increase blood flow. Waste products clear while nutrients reach damaged tissues.
Sleep needs increase when you emphasize quadrants two and three. Proximity training to failure creates muscle damage that repairs during sleep. Seven hours becomes insufficient when you train this way.
Nutrition timing matters more in high stress quadrants. Protein and carbohydrates consumed immediately after training support glycogen restoration. This habit lets you maintain training frequency without performance decline.
Deload weeks become mandatory when you program the matrix aggressively. Every fourth week drops both load and proximity significantly. Your tissues heal and supercompensation occurs.
Common Mistakes When Applying The Proximity Load Overload Matrix
Beginners often camp in quadrant three exclusively. They use moderate weights and push every set to failure. This approach works briefly but leads to overtraining quickly.
The opposite mistake involves never approaching failure. Staying five reps in reserve on every set feels safe. But your muscles never receive adequate stimulus to grow.
Ignoring exercise selection for each quadrant wastes potential. You can’t safely explore quadrant two on barbell rows. Form breaks down and injury risk skyrockets before you reach true failure.
Poor proximity estimation undermines the entire system. If you think you’re at two reps in reserve but really have five, your programming falls apart. Film your sets and verify your perception matches reality.
Changing quadrants too frequently prevents adaptation. Some people switch emphasis every session chasing variety. Your body needs three to four weeks in a quadrant to respond.
Neglecting the recovery quadrant causes accumulated fatigue. Every week needs at least one session in quadrant four. Quality recovery supplements help manage the stress from intense training phases.
Tracking Progress Through The Proximity Load Overload Matrix
You need detailed training logs to apply this system effectively. Simple workout apps miss the proximity data that makes everything work. Record load, sets, reps, and reps in reserve for every work set.
Compare performance within the same quadrant across weeks. Did you add weight while maintaining proximity? That signals clear progress worth celebrating.
Look for patterns when progress stalls. Maybe you’ve pushed quadrant two too long without backing off. Perhaps your proximity estimates drifted and you’re not working hard enough.
Bodyweight and performance velocity provide additional feedback. Losing weight while maintaining strength means you’re getting leaner. Bar speed slowing at the same loads suggests accumulated fatigue.
Photos reveal changes that numbers sometimes miss. Muscle growth happens while strength plateaus during certain quadrant emphases. Your mirror and camera tell part of the story.
Heart rate variability tracks recovery status between sessions. Low variability means your nervous system hasn’t recovered from previous training. That day might need a quadrant four session instead.
Häufig gestellte Fragen
What does proximity mean in the matrix?
Proximity refers to how close you push each set to complete muscular failure. Two reps in reserve means you could do two more reps. Zero means you reached true failure where another rep is impossible.
How often should I change quadrants?
Spend three to four weeks emphasizing one quadrant before switching focus. Your body needs this time to adapt to the specific stress. Changing weekly prevents real adaptations from occurring.
Can beginners use The Proximity Load Overload Matrix?
Beginners should master basic movement patterns first before applying the matrix. Once you can perform exercises with good form, the matrix accelerates progress. Start with quadrants one and four only.
Which quadrant builds muscle fastest?
Quadrant three produces rapid hypertrophy for most people when used correctly. Moderate loads pushed to failure create metabolic stress without excessive joint strain. But rotating quadrants prevents plateaus long term.
Do I need supplements to use this system?
The matrix works without supplements if nutrition and sleep are solid. However, quality supplements support recovery when training intensity increases across quadrants. They become more valuable during demanding training phases.
Start tracking your proximity and load in every session this week to see where you actually train within the matrix.